Wednesday 25 October 2017

Gift Wrapping with Yarn & Embroidery Thread

Today's gift wrapping ideas are all about yarn and colourful threads.

Yarn.  

This is a really fun way to use up leftover yarn from your knitting and crochet projects! It works best for small parcels (so you can use up shorter scraps) but if you've got whole balls of yarn left over you can wrap larger gifts this way as well.


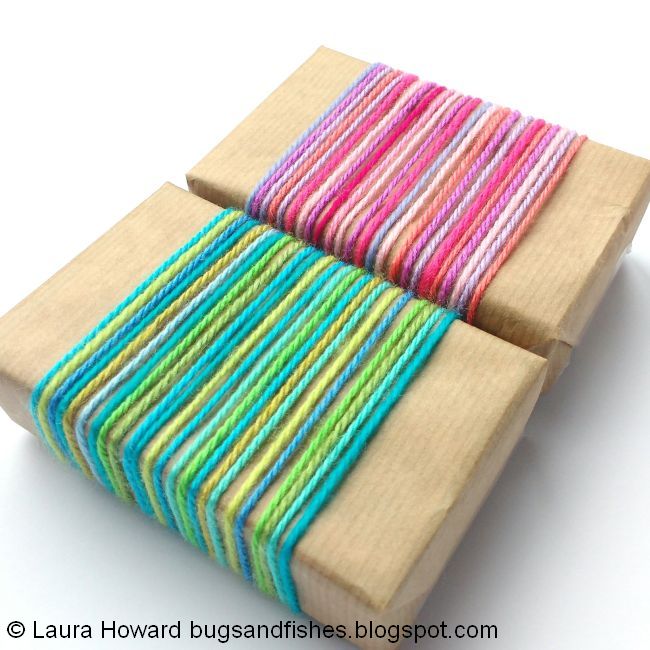
For this project I selected some colours from my stash that went together (fresh blues and greens, and bright pinks and purples), then tied lots of yarn pieces of around a couple of small parcels to form bands of colour.


Use one length of yarn to test out how long a piece you need to reach around the parcel and tie the yarn securely, then use this bit of yarn as a size guide when cutting the other pieces. Add the yarn pieces gradually, mixing the colours to create a pattern or a nice blend of shades.

Position the yarn so it's all in a neat block in the centre of the package then trim any excess yarn so the underneath of the parcel is nice and neat. You may also want to add a bit of sticky tape to the bottom of the parcel to hold the strands in place if you'll be transporting the parcel.

Woven Threads.

This idea is a lot more subtle than some of my gift wrapping suggestions, but I kinda love it anyway.


For this look, you'll need some embroidery thread (or yarn or narrow ribbons). I used two colours but you could use all one colour or combine lots of different shades (e.g. if you're using bits of yarn or thread left over from other projects).


Cut a length of thread and tie it horizontally across the parcel, with the knot hidden underneath. Trim any excess thread and secure the knot in place with a piece of sticky tape. Repeat to create several horizontal lines across the parcel. If you're using ribbon, secure each end of the ribbon with sticky tape instead of knotting it so the ribbon lies totally flat against the parcel.

Then repeat this process with the second colour, creating vertical lines. This time, weave the thread between the horizontal threads (over, under, over, under, and so on) before securing it. Ta-da! One woven parcel.

Enjoyed this gift wrapping idea? Buy me a "coffee" and help support my blog!

Buy Me a Coffee at ko-fi.com

Subscribe to my newsletter for a monthly free pattern and visit my crafty tutorial archive for lots more free projects.

Visit my shop to buy my printable PDF sewing patterns:

Saturday 21 October 2017

A Year of Wreaths: October Cosy Cat Felt Wreath

UPDATE: my October sleeping kitty wreath tutorial is now available as a printable PDF pattern on my Patreon. 

Subscribe to get instant access to a growing library of PDF embroidery patterns and craft tutorials, and updates when I add something new!

 
Click here to see all 12 seasonal wreaths in this series!

-----
  
A Year of Wreaths continues!

Cosy Cat Felt Wreath

October's wreath is for all you Cat Ladies (or Cat Gentlemen), as it features a cute sleeping kitty. I love this little guy and I hope you will too.

Cat Lady Felt Wreath Tutorial
Cat Lady Felt Wreath


Subscribe to my newsletter for a monthly(ish) free pattern and visit my crafty tutorial archive for lots more free projects.

Thursday 19 October 2017

9 Free Halloween Craft Tutorials

Are you planning some Halloween crafting? Here are nine ideas from my free tutorial archive you might enjoy...

1. Eyeball buttons. These are great for giving an old cardigan a spooky twist! You could also sew them in other places too - eyeballs are the perfect Halloween accessory, you know.

Felt eyeball buttons
 Eyeball button cardigan for Halloween

2. Sew some cute little felt candy corn ornaments...

Cute felt candy corn ornaments
 
... or 3. Make a giant plush candy corn!

Felt candy corn

4. If you prefer your Halloween decor more chic than cute, why not make some candy corn inspired geometric Halloween coasters?

Geometric coasters for Halloween

5. Dress up as an owl with this fun felt owl mask.

Felt owl mask
 Felt owl mask

6. Disguise yourself with a felt moustache.

Felt moustache disguises

7. Turn any outfit into a Halloween costume with a sparkly dripping wound brooch.

Felt dripping wound brooch

8. Make a fun Halloween card to send to your friends (includes instructions for how to turn your drawing into an e-card!).

Cute Halloween Card
 
9. Finally, invite all your pals to your Halloween party with these easy-to-make invitations. You could also use these templates to make a cute Halloween garland.

Halloween Party Invitations
 
Follow the links to find all the tutorials. Happy crafting!

You'll find eight more of my Halloween craft tutorials in Felt-o-ween: 40 scary-cute projects to celebrate Halloween - including a vampire, graveyard cupcake toppers, skull bows and more! (I am a teeny bit biased but I adore this book: so much felt-y Halloween goodness!). Felt-o-ween is available from Amazon USA, Amazon UK, The Book Depository and many other bookshops, you can read more about the book and take a peek at my projects here. (Disclosure: those links to Amazon & The Book Depository are affiliate links).

Cover of Felt-o-ween

For more Halloween craft ideas, visit my Halloween Pinterest board!

And for lots more crafty ideas to keep you busy after Halloween, visit my tutorial archive or check out my books: Super-Cute Felt and Super-Cute Felt Animals.

 Cover of Super-Cute Felt by Laura Howard

P.S. Thinking ahead for Christmas? Check out my free Christmas Ornament Tutorials.

Monday 16 October 2017

Gift Wrapping from Your Garden: Lavender, Hydrangeas & Leaves

My gift-wrapping series continues with three ideas for decorating your gifts with bits and pieces from your garden. You've got to take care when transporting gifts topped with cuttings, to ensure they don't get damaged, but it'll be worth it for the "oooh!"s they elicit.

Lavender & Washi Tape. 

If you've got a lavender bush in your garden, you'll know you end up with a lot of cuttings when you trim it at the end of summer! Dried lavender smells amazing and the stems look lovely... so why not use them to decorate your gifts?


I rescued some stems from last year's cuttings pile and trimmed them with scissors, laying them out across the parcels to plan my arrangement.

Tear strips of washi tape (I used a lovely pink polkadot design) and stick them to the parcel at various angles - leaving space to add the final piece of tape in a moment.

Arrange the lavender pieces, then carefully stick down the final piece of tape, pressing the tape flush around the stems to hold them firmly in place.

Hydrangeas. 

I have been slightly obsessed with hydrangeas lately (I blame Instagram, honestly). My mum's hydrangeas were such an eye-popping bright pink at the height of summer, then faded into these irresistibly lovely, soft tones. You could use a clipping from a hydrangea bush for gift-wrapping during the summer, of course, but I think this is a great way to make the most of your hydrangeas in autumn, when the blooms are beginning to fade but still have a lot of charm to them.


One hydrangea bloom makes for a spectacular gift topper. Cut a smallish bloom (one that you can lay on its side) with a few inches of stem. Position it on your parcel and stick it in place with a couple of strips of pretty washi tape. Super easy, but really rather gorgeous. I think the faded tones look particularly lovely with the brown paper I like to use for my gift wrapping.

You can also use the larger blooms as gift toppers - they look amaaaaazing.


To make use of one of the larger blooms, you'll need to cut the stem short so it will sit flat on top of the parcel. Cut two long pieces of bakers twine (or other string, narrow ribbon, etc). Tie the pieces of twine to the top of the hydrangea stem, at right angles from each other (the way hydrangea flowers grow out from the main stem makes it very easy to secure the twine). Place the bloom in the centre of the parcel and wrap the four ends of the wind around, knotting them securely underneath, then trim any excess twine.

Tip: set the parcel on its side as you tie the knots underneath, so you can keep two hands free for the knots and not squish the hydrangea beneath the parcel. Alternatively, get someone else to help out and hold the parcel as you secure the twine.

Painted Leaves. 

My third nature-inspired gift wrapping project is all about leaves.


I love the texture of these leaves and the contrast of the crisp white shapes against the brown paper - though you can, of course, use any colour paint you want. You could also paint several smaller leaves and arrange them in a row, or use a marker to carefully write a message or name on the painted leaf like a tag.

I used white acrylic craft paint to paint my leaves. I painted several coats on each side, leaving the leaves to dry between coats. The paint helps the leaves keep their shape but they're still quite delicate, so take care when working with them!

Position the leaves on top of your parcels and attach them by wrapping round and round with white sewing thread, creating a subtle stripey effect. For leaves without stems, you could alternatively use double-sided tape or craft glue to attach the leaves - but bear in mind the leaf's 3D shape will mean only parts of the leaf will be touching the paper, so make sure to add your adhesive at those points.

Enjoyed this gift wrapping idea? Buy me a "coffee" and help support my blog!

Buy Me a Coffee at ko-fi.com

Subscribe to my newsletter for a monthly free pattern and visit my crafty tutorial archive for lots more free projects.

Visit my shop to buy my printable PDF sewing patterns:

Sunday 15 October 2017

More Decluttering = More Stuff for Sale!

I've added a few more things to my Instagram sale, including...

... a white perspex bird brooch:

https://www.instagram.com/lauralupinsells/

... a gigantic (25cm) wooden button (actually a trivet / cheese board, but I think this would also make fab craft room decor):

https://www.instagram.com/lauralupinsells/

... and some felt mice and cheese brooches:

https://www.instagram.com/lauralupinsells/

There are also lots of craft supplies still available...

https://www.instagram.com/lauralupinsells/

... plus some craft books...

https://www.instagram.com/lauralupinsells/

... and some decorative bits and bobs as well.

https://www.instagram.com/lauralupinsells/
 https://www.instagram.com/lauralupinsells/

Click here to see all the available listings, with more info and photos

You can leave a comment on an item to claim it, but if you don't use Instagram don't worry! If you see things you want to purchase, just send me a message via my contact form to let me know what you're interested in.

I've listed the price and UK postage of each item, but I'll combine the postage for each parcel and only charge what it actually costs to post (in the UK you can send a shoebox sized parcel weighing up to 2 kilos second class for just £2.90).

Wednesday 11 October 2017

August & September in Pictures: Colourful Threads, a Happy Cat and a Tricky Selfie

Time to look back at some of the stuff I got up to in August and September!

My August involved colourful threads (shout out to Instagram genius Sara Tasker of Me & Orla and her put-your-phone-in-your-teeth-and-take-a-photo-with-the-timer photo technique - a bit awkward, but you can't argue with the results!)...


... and more muted ones, as I started to dream about Autumn.


I bought lots of books (it's awesome living in a town with a bookshop again, but not so great for my bank balance)...


... ooohed over some rather fabulous scaffolding...


and went on a photo walk organised by Instagramers Bristol (super fun!).


I blogged about the books I've been reading and finally had an excuse to share this deliciously yellow pic from the spring (the Boston Tea Party breakfast was just as delicious as that yellow looks!)...

http://bugsandfishes.blogspot.co.uk/2017/08/read-more-books-february-to-may.html

... revealed August's slightly over-the-top wreath design for A Year of Wreaths (ice cream! and sparkles! and hearts! and emojis! oh my!)...

http://bugsandfishes.blogspot.co.uk/2017/08/august-felt-ice-cream-emoji-wreath-tutorial.html

... and hung out with this fella, who was very happy to finally be exploring his new garden after weeks of stress, travel, and being kept indoors because of my parents cross-country move (just look at his little face!).


September started with a messy desk, as I worked on some projects for the Village Haberdashery.


I totally fell in love with the colours of these cards & envelopes from their shop, while working on some paper crafting projects. Aren't they just dreamy?


I shared some of the very many photos I took of the gorgeous branch of VV Rouleaux that opened recently in Bath (so much colour, oh my goodness)...


... blogged about a very fancy, very exciting trip to Bristol...

http://bugsandfishes.blogspot.co.uk/2017/09/adventures-in-travel-blogging-trip-to-bristol.html

... and bought a whole bunch of nostalgic stamps for my letters.


I laughed myself silly trying to take photos of myself modelling the owl mask from my latest tutorial - it turns out it's very difficult taking selfies when you can't see your phone cos you're not wearing your glasses!

http://bugsandfishes.blogspot.co.uk/2017/09/felt-owl-mask-tutorial-for-halloween.html

Oh, and - as if one themed Instagram account wasn't enough - I decided to start a new Instagram account for sharing the photos I take on my day trips to (wonderful) Bristol: Bristol My Beating Heart (and yes, I am very proud of that pun, thank you).

https://www.instagram.com/p/BZlkWQODYcz/
 https://www.instagram.com/bristolmybeatingheart/

For more colourful, crafty updates you can find me on Instagram, Facebook and Twitter.